Fall is the season of vibrant colors and creativity, and what better way to infuse that spirit into your crafts than with the magic of color powder? Color powder crafts can harness the vibrancy and versatility of color powder, turning your autumn projects into works of art.
Fall Leaf Art with Color Powder
The beauty of fall leaves is an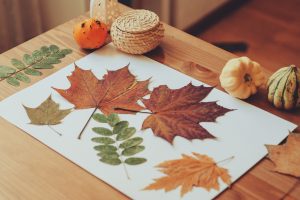 iconic aspect of the season, and with color powder, you can elevate that beauty to new heights. Fall leaf art using color powder is not only a creative craft, but also a sensory experience. The texture of the color powder combined with the organic shapes of the leaves brings a tactile dimension to your artwork.
Materials Needed:
- Color Powder: Choose a variety of autumn colors like reds, oranges,and yellows to capture the fall spirit.
- Leaves: Gather a mix of shapes and sizes. Choose leaves with defined veins and features for a more intricate effect. They can be freshly fallen or collected, just make sure they are totally dry, clean, and bug-free.
- Glue: A clear-drying, non-toxic glue works best for adhering color powder to leaves.
- Paper: A sturdy paper or canvas to serve as your background. Consider using darker shades to make the colors pop.
How-To Instructions:
- Lay out your paper or canvas on a flat surface and gather up your leaves.
- Apply a thin layer of glue to the front side of a leaf. Don’t be shy; the glue will act as the adhesive for the color powder.
- With the glue still wet, sprinkle the color powder over the leaf. Feel free to experiment with different color combinations. Watch as the powder adheres to the glue, creating an exciting, textured effect.
- Gently tap the leaf to remove any excess color powder. This creates a more clean and defined design.
- Repeat the process with different leaves and color combinations. Get creative! Try layering colors or creating gradients by blending different hues.
- Let your colorful creations dry completely. This usually takes a couple of hours. You can speed up the process with a hairdryer on low heat.
- To preserve your fall leaf art, consider using a clear sealant spray found in most craft sections. This step not only protects and preserves the colors but also adds a subtle sheen to your masterpiece.
Tips for Creating Stunning Fall Leaf Art:
- Mix color powders to create new shades. For example, blend red and blue to create a rich purple.
- Choose leaves with varying colors and textures to add depth to your artwork.
- Incorporate leaves of different sizes for visual interest. Larger leaves can serve as focal points, while smaller ones add detail.
- Consider making a series of fall leaf art pieces. Displayed together, they can tell a beautiful visual story of autumn.
- Leave areas of your paper or canvas free from color powder to create negative space to add balance and draw attention to the vivid colors.
- Once dry, frame your fall leaf art for a polished look. This not only preserves your creation but also makes it easy to display or gift.
Don’t be afraid to let your imagination run wild – experiment, embrace imperfections, and enjoy the process of bringing the beauty of fall indoors through your unique creations.
Festive Color Powder Pumpkin Decorating
Pumpkins are iconic symbols of fall, and with color powder, you can transform them into eye-catching pieces of art. Color powder pumpkin decorating is a fantastic way to bring a burst of creativity to your fall decor. The powder adheres beautifully to the textured surface of pumpkins, allowing for endless possibilities
Materials Needed:
- Color Powder: Choose a seasonal palette or go all out with a bold rainbow of colors in color powder packets or squeeze bottles.
- Pumpkins: Opt for a mix of sizes and shapes. Whether it’s mini pumpkins for a tabletop display or larger ones for a front porch statement, variety adds visual interest.
- Adhesive: A clear-drying adhesive, such as a craft glue or Mod Podge, works well for this craft.
- Paintbrushes: Small to medium paint brushes for applying the adhesive and color powder with precision.
- Drop Cloth or Newspaper: To make cleanup a breeze.
 How-To Instructions:
- Wipe down your pumpkins with all-purpose cleaner or diluted dish soap and water so they’re clean and dry. Any dirt or moisture can affect the final adherence of color powder. Allow the pumpkins to fully dry before starting the craft.
- Then lay down a drop cloth or newspaper to catch any stray color powder to make cleanup much easier.
- Using a paintbrush, apply a thin layer of adhesive to the areas of the pumpkin you want to decorate with color. This could be the entire surface or specific sections depending on your design.
- While the adhesive is still wet, sprinkle color powder onto the pumpkin using color powder packets or squeeze bottles. Don’t be afraid to layer colors or create patterns. Experimentation is key!
- Gently pat down the color powder to help it stick. Then, tap the pumpkin to remove any excess powder. This step helps define your design and prevents colors from blending too much.
- Continue the process, working in sections, until your pumpkin is fully decorated. Feel free to layer colors or create gradients for added depth.
- Allow your color powder-decorated pumpkins to sit for several hours to allow the adhesive to set and the colors to adhere properly.
- If you plan to keep your pumpkins outdoors or want extra durability, consider sealing the design with a clear spray sealant. This step adds a protective layer and helps the colors withstand the elements.
Tips for Color Powder Pumpkin Decorating:
- Experiment with different color combinations to create visually striking pumpkins.
- Use color powder to highlight the natural ridges and texture of the pumpkin. This adds texture and visual interest to your design.
- From polka dots to stripes, let your imagination run wild with patterns. The fine texture of color powder allows for precise detailing.
- Consider including additional materials like ribbons, twine, or even metallic accents for a mixed-media pumpkin masterpiece.
- Write messages or create simple designs using color powder to personalize your pumpkins. This is a fun way to add a unique touch to each pumpkin in a display.
This DIY project not only adds a bold and artistic touch to your space, but also offers a fun and interactive crafting experience.
Colorful Fall Color Powder Candles
Create a cozy ambiance in your home with vibrant fall-themed candles. Color powder decorating transforms plain candles into pieces of art, adding a touch of fall to your home decor.
Materials Needed:
- Color Powder: Embrace the warm tones of fall with high-quality color powder.
- Plain Candles: Opt for unscented, white, or light-colored candles to allow the color powder to shine.
- Wax Adhesive or Mod Podge: A clear-drying adhesive that works well with candles.
- Paintbrushes: Small to medium-sized brushes for applying adhesive and color powder precisely.
- Protective Covering: Use a disposable tablecloth or newspapers to protect your workspace.
How-To Instructions:
- Confirm that your candles are clean and free from any dust. Wipe them down with a damp cloth if needed.
- Lay down a protective covering to catch any wayward color powder. This will make cleanup easier.
- Using a paintbrush, apply a thin layer of wax adhesive or Mod Podge to the areas of the candle you want to decorate. This could be the entire surface, specific sections, or in patterns.
- While the adhesive is still wet, sprinkle color powder onto the candle. Experiment with layering colors or creating gradients to achieve the desired effect.
- Gently pat down the color powder to ensure it adheres to the candle. Then, tap the candle to remove any excess powder. This step helps define your design and prevents colors from blending too much.
- Continue the process, working in sections, until your candle is fully decorated. Feel free to mix and layer colors for a dynamic look.
- Let your decorated candles sit for a few hours to allow the color to set properly.
- If you want to add extra durability, consider using a clear spray sealant. This step protects your color powder design and ensures it withstands handling.
Tips for Creating Stunning Color Powder Fall Candles:
- Combine warm autumn colors for a cozy and inviting feel. Reds, oranges, and yellows work harmoniously to evoke the spirit of fall.
- Try creating patterns or even simple designs on your candles. Chevron, swirls, or geometric shapes can add an artistic touch.
- Experiment with layering colors. Start with a base color and add accents or gradients for depth and complexity.
- The same color powder design may look different on various candle sizes. Adjust your design accordingly for consistency.
- Enhance your candles even more by adding accents such as ribbon, twine, or even color powder fall leaves. These additions can elevate your overall design.
This DIY project not only allows you to experiment with colors, but also offers a unique way to personalize candles for different occasions. Whether displayed as a centerpiece or adorning your mantle, these colored powder candles will infuse your space with the warmth and beauty of fall.
Fall Wreaths and Centerpieces
Combine your color powder crafts to create festive and fun wreaths and centerpieces. When combining leaves, candles, and pumpkins in fall wreaths and centerpieces, the key is to balance the different elements visually.
Start by choosing a wreath or centerpiece base that complements your space and sets the tone. Maybe your space is rustic, elegant, or eclectic – use your design aesthetic to guide your design decisions.
First, intersperse pumpkins, varying in size and color, to anchor the arrangement both visually and literally. Then, integrate the leaves throughout, creating a lush backdrop. Position candles strategically so they enhance the overall ambiance without overshadowing the natural beauty. Use basic safety measures when working with lit candles, especially around dried fall leaves.
Creating wreaths and centerpieces with autumn pieces and color powder is a fun way to infuse the spirit of fall into your home decor. Whether adorning your front door or gracing your dining table, these colorful creations will let your creativity – and the magic of autumn shine.
Conclusion
As the crisp air and golden hues of fall surround us, there’s no better time to flex your creativity with color powder in your decor and costumes. From leafy art to festive pumpkins and everything in between, the possibilities are endless.
Don’t stress about perfection – there’s no rulebook for fall crafting. Your fall crafts should feel like you. Mix and match, play with colors, and let your imagination run wild. Whether it’s a rustic vibe, a touch of elegance, or a mishmash of everything, it’s perfect as long as it feels like home.